
Today, I thought it would be fun (and perhaps informative) to add a little tutorial on a couple different editing styles and how they can complete a photo. I grabbed a photo from a quick shoot that I did with Chloe last month and edited it in two ways in order to highlight a few techniques that will hopefully come in handy with your own editing! Ready? Let's go! :)
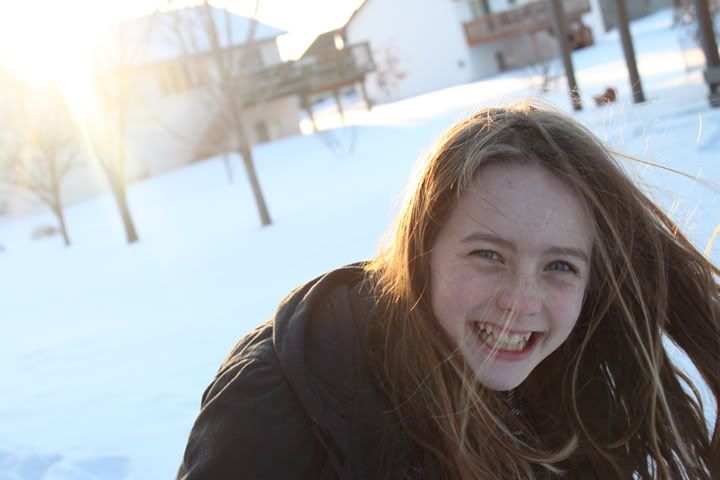
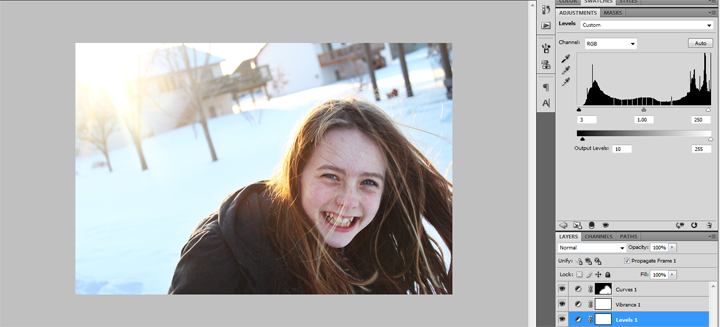
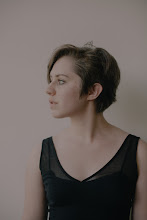
I started off with a basic photo of Chloe. The exposure was pretty good, with her face being a little dark due to backlight, but overall, it was a decent picture.
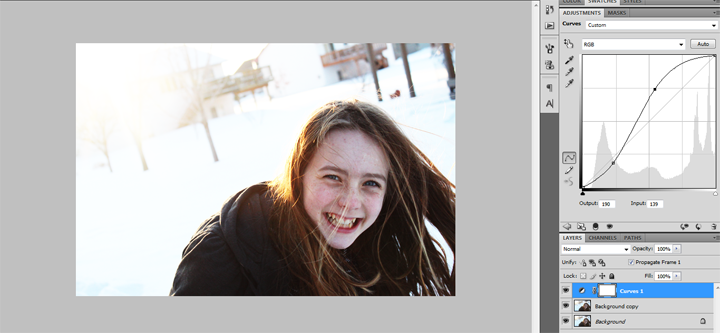
First, I added a curves layer and made a dramatic s-curve. However, I didn't like the blown out background so I inverted the mask layer, and then painted in Chloe. The contrast was pretty strong, and as a result, I put the first output at 183.
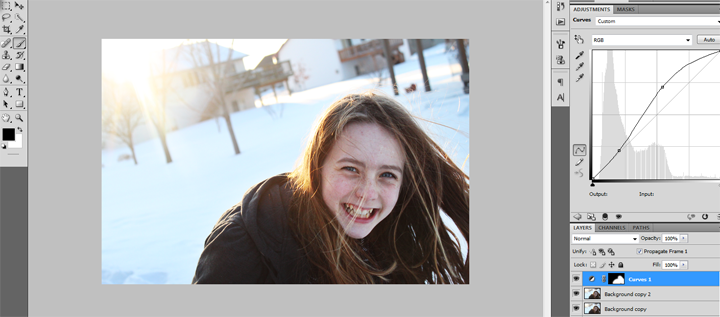
Aferwards, I duplicated the background layer (CTRL + J on Windows) and put it on Soft Light at 25%.
Are you with me so far? Good!
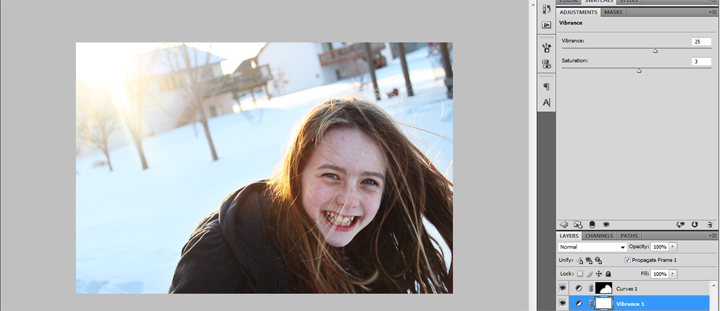
I loved the colors in the photo and wanted to give them a little boost, so I added a vibrance layer at Vibrance + 25 and Saturation +3. (should be on the right sidebar OR, go to Image >> Adjustments >> Vibrance.)
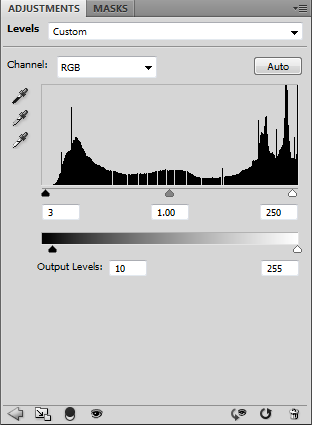
The photo was looking pretty good, but I wanted the image to be a little brighter, so I added a Levels adjustment and put it at this:
I selected all the layers and merged them ( CTRL + E on Windows), then duplicated the background layer and put it on Soft Light, then went to Filter >> Other >> Highpass and did a highpass at 1.5. The sharpness was too strong for me, so I put the layer at 35%.
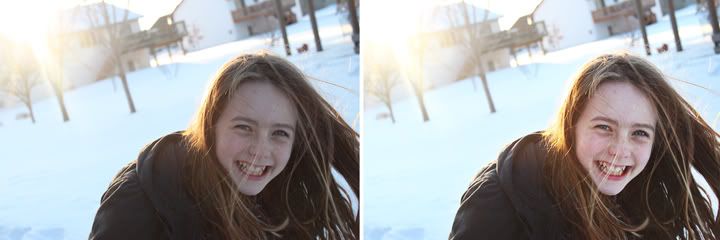
That completed the simple edit and clean look I was going for. It's a fast and effective way to brighten up and boost a photo. Here's the Before & After.
Let's say you've got a little more time on your hands and are looking for a fun way to edit your photos -- or maybe you're looking for a vintage or retro look. Or, maybe you just wanna play around in photoshop (which I definitely like to do sometimes. ;)) This is one of my favorite ways to finish my photos up. I like to try to replicate film effects sometimes, but today, here's just a fairly simple vintage edit.
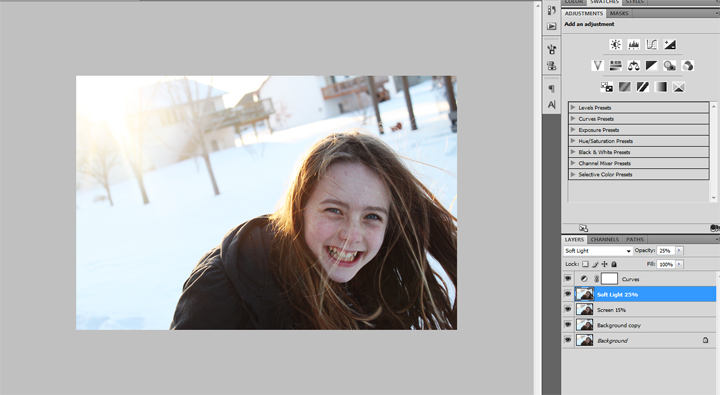
Again, I started with the same photo of Chloe and added a slight s-curve, copied the background layer and put it at Soft Light 25%, and under that, copied the background again and set it at Screen 15%.
Now here's where the fun really begins. :)
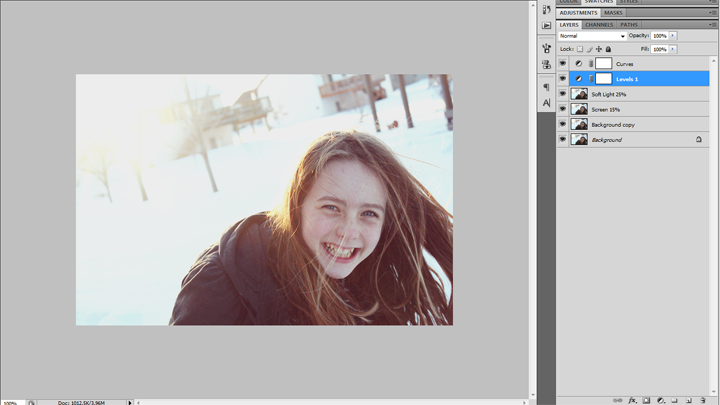
I added a levels layer and put the settings at this:
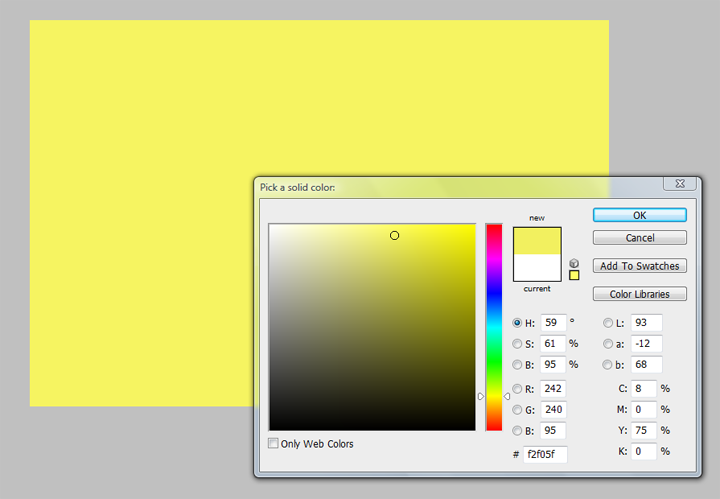
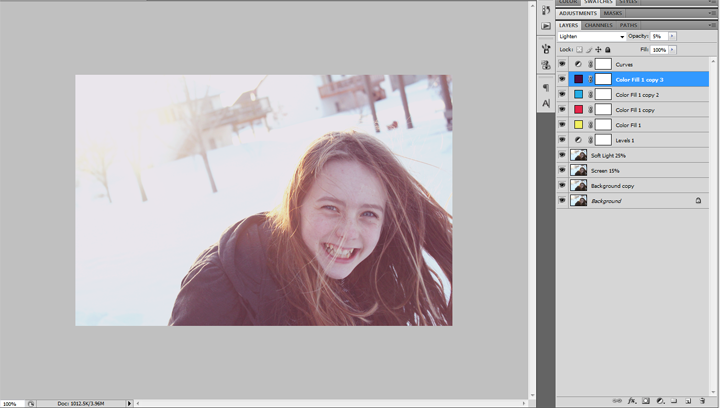
There's a big difference already! After that, I click this button and add a #f2f05f color at Exclusion 4%. I repeated that and added a #e6264a Soft Light at 25%, #26ade6 Screen at 15%, and a #4f0c3b Lighten layer at 5%.
Here's where we are so far.
Since all the layer levels were added, the contrast needed to be bumped up again, therefore I went back to my Soft Light Layer (the one that was a copy of my background) and raised it to 75%. I also went back to my #e6264a Soft Light Layer and lowered it to 15%.
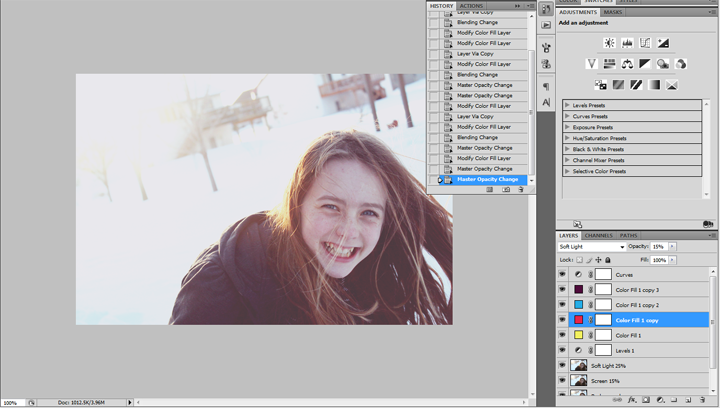
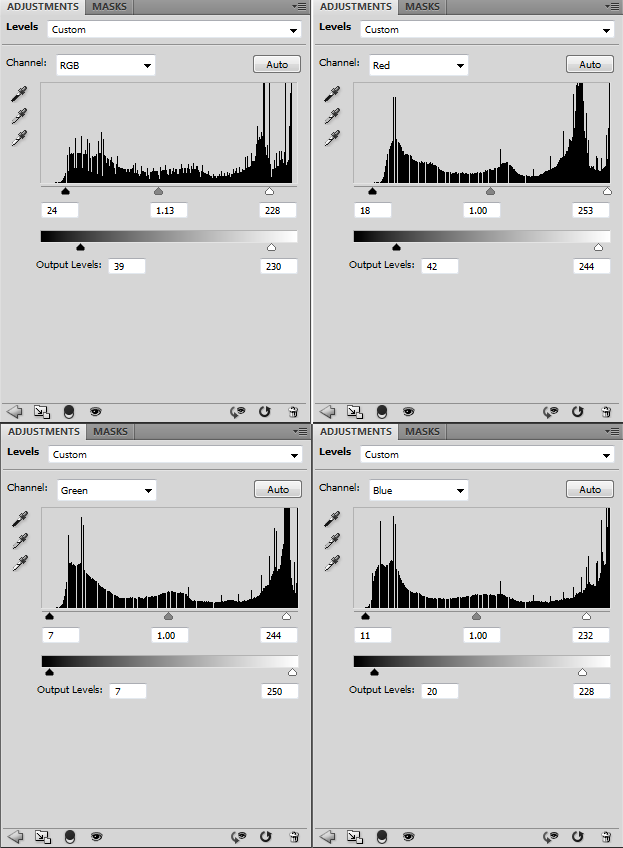
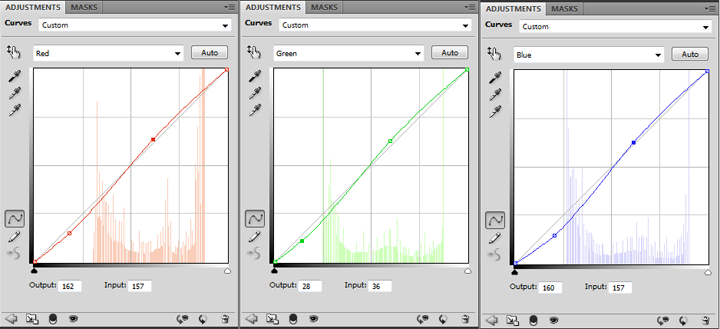
I wanted a bit more color boost, so I went back to my curves layer and inside of switching the RGB, edited the Red, Green, and Blue layers.
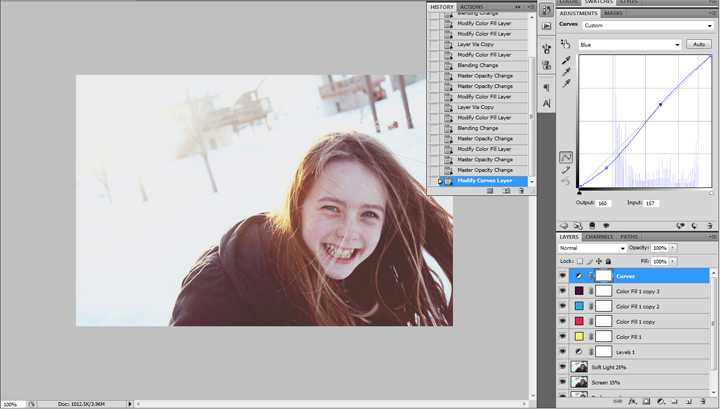
The image was looking pretty good, so to finish it off, I added a Photo Filter (Warming Filter) at 15%, flattened the photo, and that finished the edit! Again, here's the before and after.

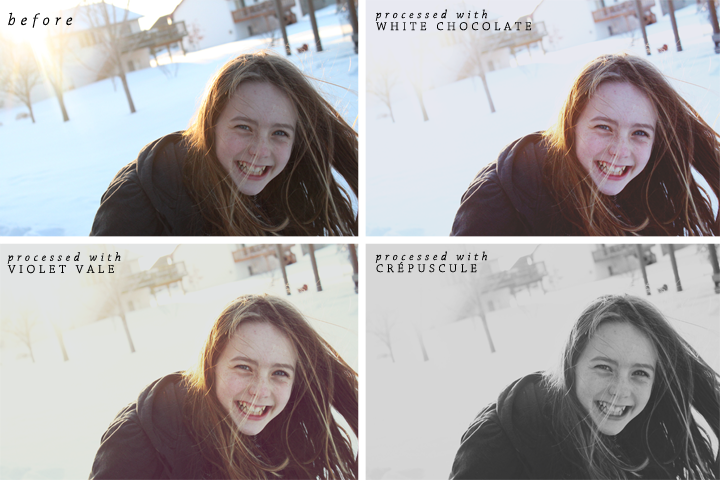
Just for fun, I've added a few more before and after images processed using some actions from my Opal Vintage set (created by me).
So there you have it! Hopefully my little tutorial was helpful, informative, or just fun to read! I use photoshop cs4 to edit all my images (and absolutely love it), but from what I've heard, you can do almost everything that you can do in photoshop in elements.
Have a favorite editing style? Any actions/textures that you just love? Please share -- I'd love to know! :-)
Much love -- and happy editing!:)
Hannah
Simple Edit.
I started off with a basic photo of Chloe. The exposure was pretty good, with her face being a little dark due to backlight, but overall, it was a decent picture.
First, I added a curves layer and made a dramatic s-curve. However, I didn't like the blown out background so I inverted the mask layer, and then painted in Chloe. The contrast was pretty strong, and as a result, I put the first output at 183.
Aferwards, I duplicated the background layer (CTRL + J on Windows) and put it on Soft Light at 25%.
Are you with me so far? Good!
I loved the colors in the photo and wanted to give them a little boost, so I added a vibrance layer at Vibrance + 25 and Saturation +3. (should be on the right sidebar OR, go to Image >> Adjustments >> Vibrance.)
The photo was looking pretty good, but I wanted the image to be a little brighter, so I added a Levels adjustment and put it at this:
I selected all the layers and merged them ( CTRL + E on Windows), then duplicated the background layer and put it on Soft Light, then went to Filter >> Other >> Highpass and did a highpass at 1.5. The sharpness was too strong for me, so I put the layer at 35%.
That completed the simple edit and clean look I was going for. It's a fast and effective way to brighten up and boost a photo. Here's the Before & After.
Vintage Edit.
Let's say you've got a little more time on your hands and are looking for a fun way to edit your photos -- or maybe you're looking for a vintage or retro look. Or, maybe you just wanna play around in photoshop (which I definitely like to do sometimes. ;)) This is one of my favorite ways to finish my photos up. I like to try to replicate film effects sometimes, but today, here's just a fairly simple vintage edit.
Again, I started with the same photo of Chloe and added a slight s-curve, copied the background layer and put it at Soft Light 25%, and under that, copied the background again and set it at Screen 15%.
Now here's where the fun really begins. :)
I added a levels layer and put the settings at this:
There's a big difference already! After that, I click this button
and add a #f2f05f color at Exclusion 4%. I repeated that and added a #e6264a Soft Light at 25%, #26ade6 Screen at 15%, and a #4f0c3b Lighten layer at 5%.Here's where we are so far.
Since all the layer levels were added, the contrast needed to be bumped up again, therefore I went back to my Soft Light Layer (the one that was a copy of my background) and raised it to 75%. I also went back to my #e6264a Soft Light Layer and lowered it to 15%.
I wanted a bit more color boost, so I went back to my curves layer and inside of switching the RGB, edited the Red, Green, and Blue layers.
The image was looking pretty good, so to finish it off, I added a Photo Filter (Warming Filter) at 15%, flattened the photo, and that finished the edit! Again, here's the before and after.
Conclusion.
If you're looking for a simple, fresh way to edit your photos, then brightening, sharpening, and boosting the colors and contrast to your image will (usually) finish it off nicely. However, if want a more extensive and vintage editing style, then the steps that I put out can be tweaked nicely to fit any photo that you have. The main thing is to remember to experiment -- photoshop is fun to play around in! :)Just for fun, I've added a few more before and after images processed using some actions from my Opal Vintage set (created by me).
So there you have it! Hopefully my little tutorial was helpful, informative, or just fun to read! I use photoshop cs4 to edit all my images (and absolutely love it), but from what I've heard, you can do almost everything that you can do in photoshop in elements.
Have a favorite editing style? Any actions/textures that you just love? Please share -- I'd love to know! :-)
Much love -- and happy editing!:)
Hannah
No comments :
Post a Comment